|
Introduction
Winning games with dice throws are all about knowing and managing odds. A good understanding of the odds
can help in minimizing the effects of luck and generating good tactics and strategy.
A special note to those who rolls one’s all the time: do not read further so as not to waste time
and effort.
This article will concentrate on the six-sided dice, applied to games of DBA
and Warmachine. The main aim is to provide enough understanding
to expand to various games and systems.
Fundamentals
The d6 is a simple animal. It is a cube, with six sides with numbers one through six with total of opposing
sides always adding up to seven.
So take a d6 and throw it. The probability of throwing any number is one in six.
Threw a one? The probability of throwing ‘one’
again on the next throw is still one in six. Note that a d6 does not have memory, so after rolling a gazillion ones in a row,
the probability of rolling one again is still one in six.
For the uninformed, one in six is about 16.7%.
So, if you have to roll, say larger than 3, then the probability is then 3 (4, 5, 6)
out of 6, that is 50%.
Multiple D6s
We see that for 1d6, the probability distribution is flat. If we add more d6s the distribution increasingly
approaches a normal distribution (i.e. Bell Curve).
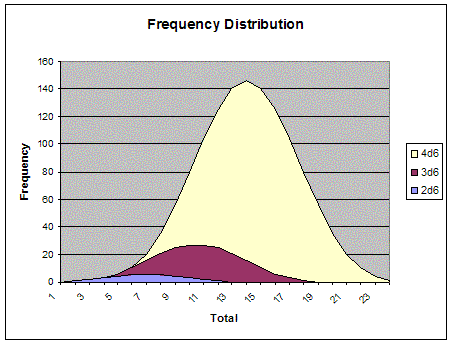
To obtain the frequency for each totals thrown can be quite complex beyond 2d6. For 2d6:
|
|
1 |
2 |
3 |
4 |
5 |
6 |
|
1 |
2 |
3 |
4 |
5 |
6 |
7 |
|
2 |
3 |
4 |
5 |
6 |
7 |
8 |
|
3 |
4 |
5 |
6 |
7 |
8 |
9 |
|
4 |
5 |
6 |
7 |
8 |
9 |
10 |
|
5 |
6 |
7 |
8 |
9 |
10 |
11 |
|
6 |
7 |
8 |
9 |
10 |
11 |
12 |
For more numbers of dice, it is more practical to write special functions for each of numbers of dice.
To do a general function would require recursive method which is beyond the capabilities of this author.
Event Tree
An event tree is a tree that describes all possible events (doh!) and its accompanying
probabilities. This is a useful tool when the probability of an outcome that is dependant on multiple events.
For example:
What is the probability for me to roll a one on a d6 three times in a row?
Ignoring inconsequential branches:
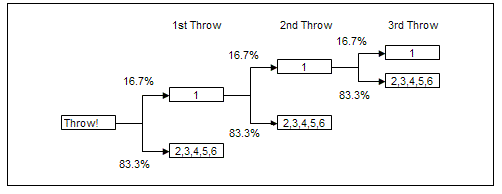
Therefore the probability of rolling 3 ones in a row is 16.7% x 16.7% x 16.7% = 0.47%
You can also obtain other probabilities such as what is the probability of rolling ones for the first two
throws (three throws total) only? Answer = 16.7% x 16.7% x 83.3% = 2.3%
Blindingly obvious.
Modifiers
In any die throwing games, there will be modifiers to adjust the effectiveness of any units. Modifiers
can be straight forward or downright complicated depending on the system they adopt.
Since this is different from game to game, we will see how modifiers affect outcomes in DBA and Warmachine.
DBA De Bellis Antiquitatis
Fast playing ancient war gaming at its best!
System
DBA system is fairly straight forward. Depending on what unit is against which in what conditions, you
have either to be double or larger than your opponents die roll after including
all the modifiers affected by unit type, support, terrain feature and etc.
Probability Table
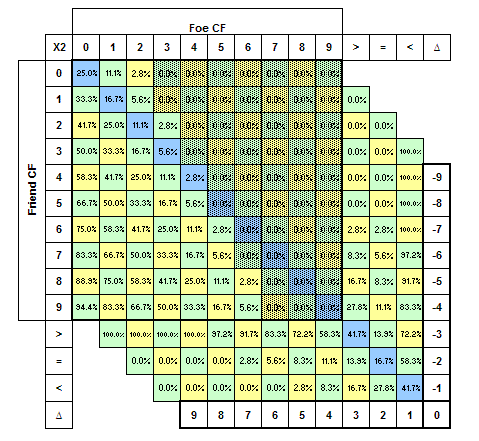
The nifty table above was made to determine the probabilities to be used in DBA.
For example, say a straight fight between a blade unit against a warband.
Without any modifiers, the combat factor for the blade is +5 whilst warband +3.
For the blade to destroy the warband, it has to double the warband.
To get the probability of this, choose ‘5’ on the Friend CF axis and ‘3’ in the Foe CF axis. We then
get 16.7% of doubling the warband. If we then get the mirror image of this point about the Friend
CF = Foe CF axis, we find that there is no possibility of the warband to double blade. But wait,
a warband quick-kills blades (i.e. destroys blades if rolls higher). So at the origin point of 16.7%,
go down diagonally to the right to the second last row, we get 16.7% chance of being destroyed by the warband.
Note that to roll larger depends on the difference between combat factors whilst to double depends on the
combat factor itself. For example, the probability to roll larger is the same for combat factors of 4 to 2, 5 to 3, 6 to 4
and etc (i.e. 72.2%) since the difference is 2 all the time. But to double, 4 to 2 is 25%, 5 to 3 is 16.7% and 6 to 4 is 11.1%.
The larger your combat factor is, the more difficult it is to be doubled. Such facts are useful. For example,
if your opponent has artillery looking right at your elephant, all you have to do is plonk a blade between them since a blade
is +5 whilst artillery is +4 and therefore artillery cannot kill blades! Or if you have one cavalry going against one knight,
it is best to avoid this without support (or bad going) since a +3 can never double a +4.
In most cases, the winner is the one who manage to maneuver his units to a favourable match-up. Data has
been gathered from a few matches, and the results support this. Of course there are always one or two odd exceptions.
Ranged Combat
In DBA, only two unit types have ranged ability, the bow and the artillery. Having a ranged unit against
a close combat unit increases the chances for the ranged unit.
First thing to consider is the range. The effective range for a bow is basically 400 paces. 200 paces speed
and 200 paces range. Therefore, a bow can make at least two attacks (if the correct moves are made), one in range and one
in close combat, against enemy units that can move up to 400 paces.
The rest can be easily seen in the event tree below for this scenario:
One bow unit facing a unit of cavalry 400 paces away. On the bow’s bound, the bow moves two hundred
paces, just in range to fire at the cavalry. The event tree stops at the second attack (cavalry’s bound) to avoid a
possible never ending event. Note that the bow versus cavalry is 4-3 modifier.
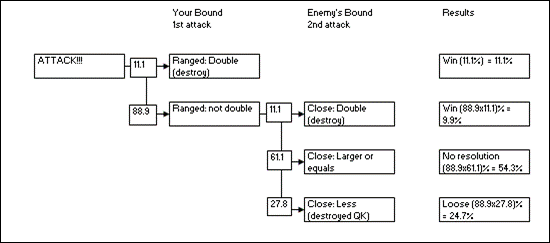
The numbers in the little boxes are the probabilities in percent. Results are:
- Winning: 21.0%
- Loosing: 24.7%
- No resolution: 54.3%
As can be seen the chances to destroy the cavalry is almost double its chances if it does not have ranged
capabilities.
Warmachine
Warmachine is simpler in terms of statistics in spite of extra rules in the system
(separate rolls to hit and damage). This is due to the fact that it does not have all those doubling effects as per DBA. The
stats that affect probabilities are RAT, MAT, ARM, DEF, and Damage (POW for ranged, POW+STR for melee).
Many questions become obvious when you start playing warmachine, e.g:
- What is the probability of succeeding in an attack?
- What is the probability of causing any damage
after succeeding in an attack?
- What is the probability of the opponent damaging
my models?
- Given limited focus, should a player boost attack,
boost damage or make an additional non-boosted attack?
Probability Table
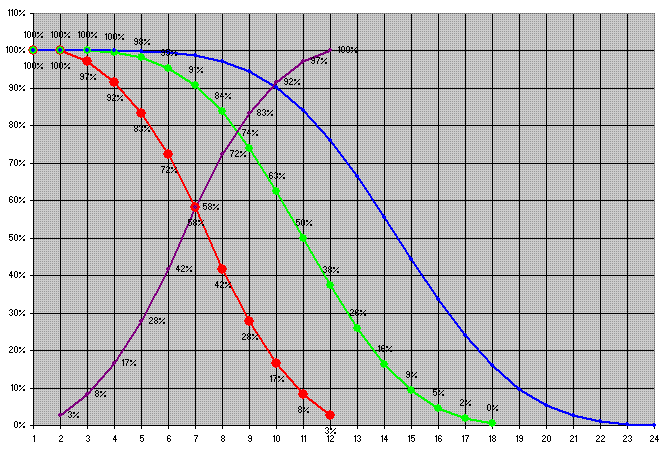
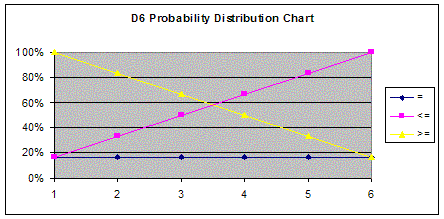
Thankfully questions 1 through 3 are quite easy to answer. A generic d6 probability chart (like one above)
can easily be used. Just calculate what you have to roll to hit. The red, green and blue curves are for 2, 3 and 4 d6 respectively.
It illustrates the probabilities to roll that number or higher.
For example, warcaster Caine shooting one shot at the
Butcher. With a RAT of 8 against the Butchers DEF of 14, Caine need a roll of 6 or higher, i.e.
72% chance of a hit. If attack is boosted (3d6), then the probability to hit increases to 95%.
The purple curve indicated probability on a d6 to roll equals or lower. This is mainly used for skill checks.
For example, a stormsmith, will a skill of 8, has a probability of 72% of succeeding a stormcall
action.
Boost Attack, Damage or Additional Attacks
Here, we investigate what decisions should be made given limited focus (for the warcaster
or warjacks), i.e. should we boost attack, damage or spend the focus for an additional attack?
The methodology used here is based on maximized damage. The results expected from this is quite obvious
since if a model has high DEF, you would want to boost attack, if has low ARM you would want to boost damage whilst obtaining
an additional attack if both DEF and ARM is low. Using probability to calculate chances to hit and expected damage, we get
for any combination of ARM-POW vs DEF-R/MAT, we get:
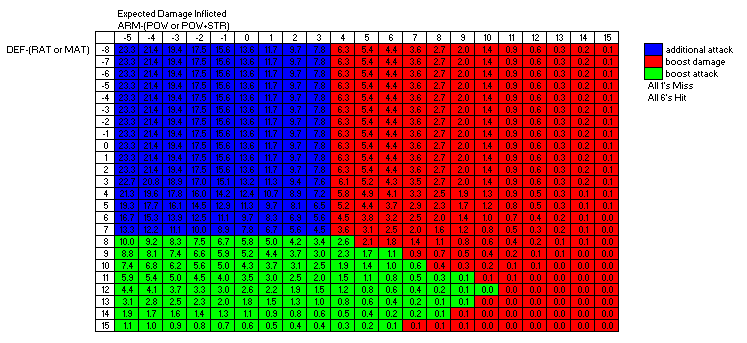
The numbers shown indicates the expected damage based on the decisions used. Blue is the area where additional
attacks should be made, red boost damage and green boost attack.
No surprise except for the lower right segment of the chart. This is due to the guaranteed hit with all
sixes.
This analysis can be expanded to consider limited focus of 2 or more. This is slightly more complex.
Conclusion
CHARGE!!
“Their's
not to make reply,
Their's not to reason why,
Their's
but to do and die”
-‘Charge of the Light Brigade’, Lord Alfred Tennyson
|